Transferring Leads
For multi-office brokerages, you can link multiple accounts in an organization and assign a lead or team member from one account to another. This will enable you to do things like set up lead routing from a centralized marketing or recruiting account to disperse to the various office accounts. To learn more about organizations in Brokerkit, click here.
This feature will only show in team accounts with an Organization ID selected, as it is only relevant for multi-office brokerages.
Reassigning Leads in Recruiting
1. Begin by selecting the drop-down menu at the top left of your page and navigate to Brokerkit Recruiting.
2. In Brokerkit Recruiter, use the search bar to search for the lead you wish to transfer, then select their profile.
3. Once you select the lead profile in recruiting, there will be a button in the top left by the lead name called “Reassign,” which will open a modal with several options.
4. Now click the dropdown selector, and you will see the team account name for all other team accounts under the Organization ID, where you can select one of the other offices. Select the desired office and then click the “Reassign” button, which will then move the individual to that office.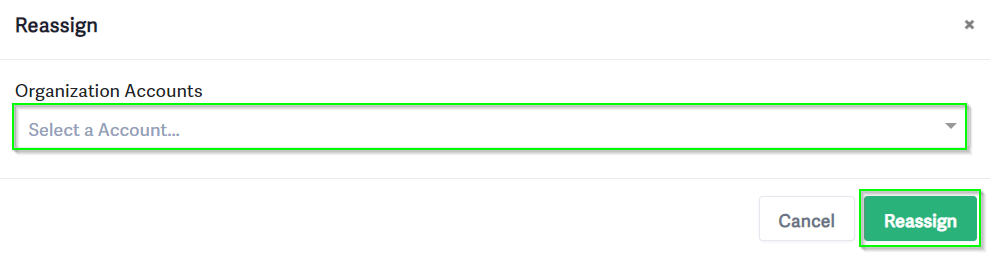
📝 Please Note: This feature exists in the Recruiting and Retention sections.
When a lead is reassigned to another office account within the brokerage, the following will happen:
- The lead will leave the initial account and show up as a new lead in the newly designated account.
- This means that the following day after the lead is moved, it will trigger the new lead notification email to admin/staff users who are subscribed to it. It will also show in your daily recruiting agenda email tomorrow under your New Leads.
Things that are not impacted by transferring a lead:
- The emails and texts sent to the lead will still show in the activity timeline in the new account as well as any logged activity.
- The following attributes of a lead will carry forward with the lead into the new account: Office address, Company, Home Address, Rating, Source, and Production Value Label.
- Labels that exist on the lead will still be there after transitioning to the new account. If that label does not exist in the new account, it will be created and searchable via the advanced search.
Things that are impacted by transferring a lead:
- An event is added to the timeline when a lead is transferred from one account to another with a timestamp, also detailing the owner and account it was transferred from.
- Campaigns: any campaigns, campaign subscriptions, and campaign triggers will not carry forward on a lead transferred.
Reassigning a Team Member in Retention
1. Begin by selecting the drop-down menu at the top left of the page and navigate to Brokerkit Retention.

2. In Brokerkit Retention, use the search bar to search for the lead you wish to transfer, then select their profile.
3. Once you select the lead profile in retention, there will be a button in the top left by the lead name called “Reassign,” which will open a modal with several options.
4. Now click the dropdown selector, and you will see the team account name for all other team accounts under the Organization ID, where you can select one of the other offices. Select the desired office and then click the “Reassign” button, which will then move the individual to that office.
Notes about transferring a team member in Retention
- The team member status will be set to Onboarding so it shows in the Onboarding queue in the new account
- A new lead notification will not be generated like when transferring a lead in recruiting since it is not a new lead.
- The staff and admin users in the target account that the team member was transferred to will be notified of the transfer via the Retention Agent update email, as the team member will show in the retention section there.
- Users can go to the User Settings page to ensure they are subscribed to the Retention Agenda email by navigating here: click your name in the top right to go to the user profile menu>User Settings>Retention Agenda emails