Brokerkit's Smart Campaign tool is one of the most powerful features in the system. Used properly, emailing and texting thousands of leads on a schedule with minimal effort from you can drastically improve your recruiting numbers.
Here's what makes Brokerkit's campaigns so smart:
- Smart Campaigns can be customized to better fit your schedule. You can choose the sending window, including the specific day(s) of the week and time of day when each step of the campaign will be executed.
- Messages can dynamically insert the lead's name and company, are blind copied, and always come from your email address, meaning the lead has no idea they were part of a scheduled mass campaign.
- If you add additional steps or reorder steps in a Smart Campaign, Brokerkit will never send the same step twice - even if you remove the campaign from a lead and add it back later. The only exception is if a campaign has been completed, in which case you’ll need to re-subscribe a lead to send any remaining new steps.
- Tasks can be assigned as steps in campaigns, which is a useful way for you and your team to delegate certain responsibilities for regularly occurring activities.
- With Campaigns 2.0, you can select exactly when email/text/task will be sent
- With Campaigns 1.0, the campaign sending window is from 9 AM to noon in your time zone. If the campaign was triggered outside this window, it will go out the following day.
Existing campaign progress plays a crucial role in determining why some contacts may not receive your campaign emails or texts:
- Contacts who have completed the campaign:
- These contacts will not receive any new email steps that you add.
- Contacts who are still active in the ongoing campaign:
- These contacts will receive any new email steps that you add.
How to create a Smart Campaign?
To create a campaign, click on the Campaigns menu option on the left side of the screen.
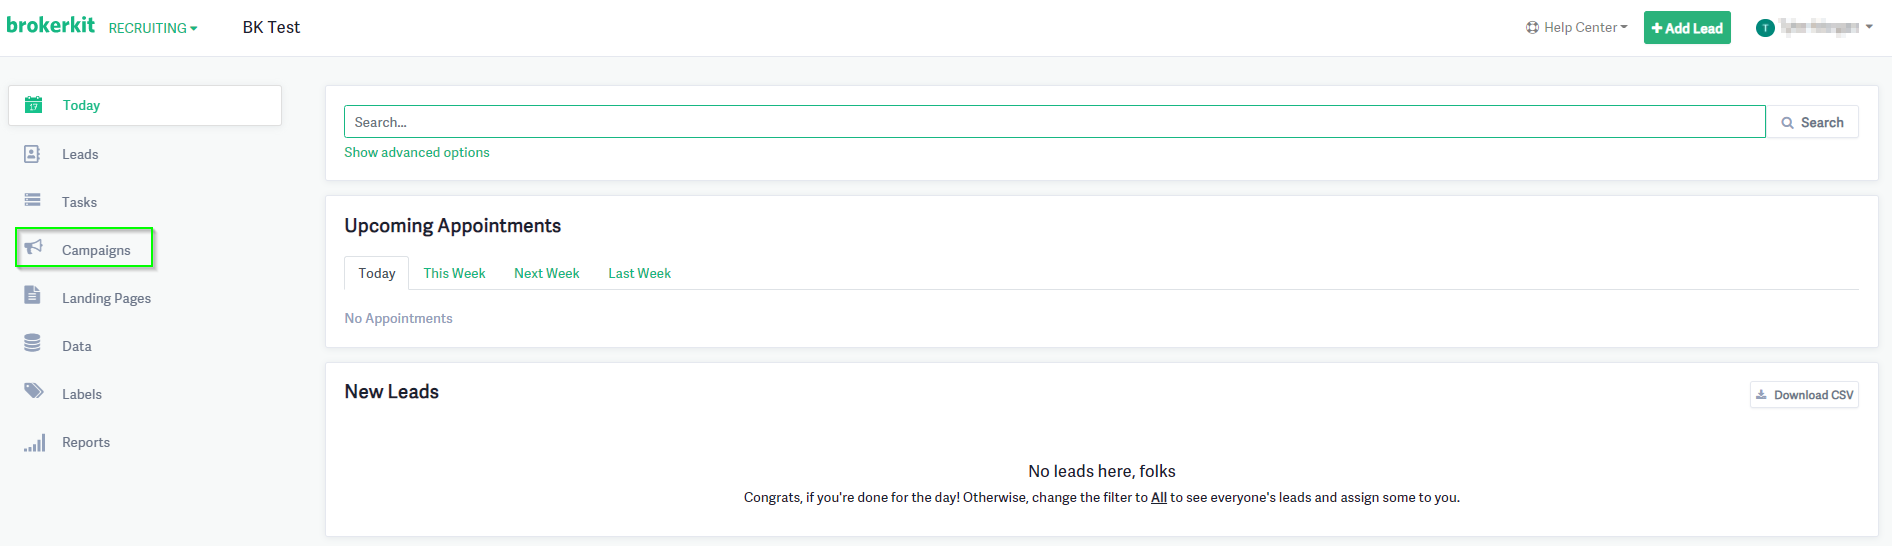
From this screen, select the Compose Campaign option.
Don’t see Smart Campaigns? While campaigns are shared across the account and can be applied and edited by any Staff and Admins, Agents and Affiliates are unable to apply or edit campaigns. Talk to your Admin about updating your role in Manage Team as detailed here.
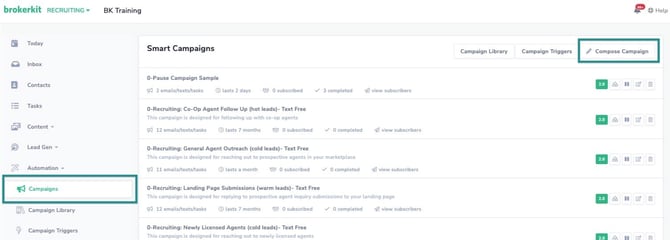
From this screen, we can see all the campaigns built for your brokerage and can Pause all current subscribers to a campaign, Edit an existing campaign, or Delete them entirely. For now, click Create from scratch.
📩 Note: If a contact is moved to the Archive, all campaigns they are subscribed to will be automatically paused.
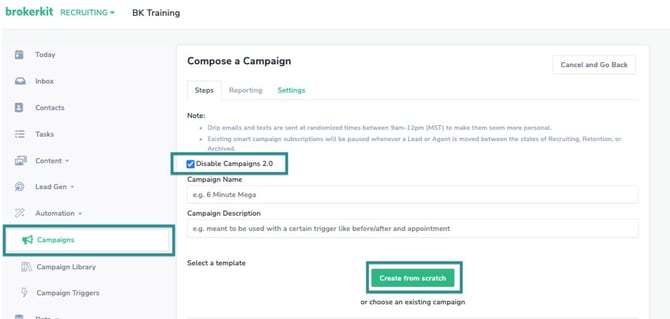
Please make sure that Campaigns 2.0 is activated to enhance your campaign's flexibility. Campaigns 2.0 are more effective because they let you tailor how you want your campaigns to go out. If you have Campaigns 2.0 enabled, you will have the option to:
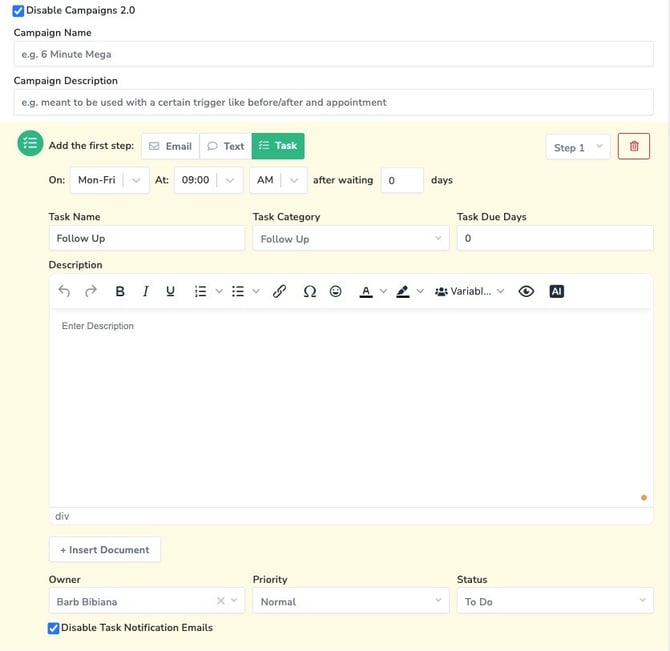
- Choose the day(s) of the week when this step of the campaign will be executed.
- Choose the time of day that the step of the campaign will be executed. The default is 9 AM - Noon randomly, but you can change it to Any Time or to a specific hour.
- Specify the wait duration in days after the prior step before this step is to be executed. Note that the wait will be processed first, and then the "On" and "At" parameters will determine when this step will be executed.
If you want to schedule the campaign to start immediately, you can choose On: Any day, To: Any time, and select the current date as the start date when triggering the campaign.
Name your campaign something you and your staff will easily recognize - leads will never see this. You can Create from Scratch or choose an existing campaign to edit, so you aren't constantly reinventing the wheel. If you choose the Task option, you can add a task as a step at any point in the campaign. You can also name the task and assign it to other users in your office.
Next, select Email or Text and use the From drop-down menu to select which Admin or Staff member will send the message. Fill in a Subject that's bound to grab the lead's attention and all your content in the Body. In all steps, use Variables to dynamically insert names, and avoid typing anything that's specific to a single lead.
Sender Configuration
When creating a campaign email step, you select who will send the message from the From dropdown menu. You have two options:
Option 1: Select a Specific User
Choose a specific Admin or Staff member from the dropdown. All campaign emails will be sent from this person, regardless of the contact's owner.
Option 2: Use "Contact Owner" (Dynamic Sender)
Select "Contact Owner" from the dropdown to send each email from the contact's assigned owner. This creates a more personalized experience, as contacts receive emails from their designated representative.
What happens when a contact has no owner?
If you select "Contact Owner" as the sender and a contact doesn't have an owner assigned, Brokerkit automatically uses a fallback sender. The system selects the active admin or staff member who was created the longest ago (essentially, the first active admin user in your account) as the sender for that email.
Best practice: If you want all emails from a specific person, choose Option 1. If you want emails to come from each contact's owner, choose Option 2 (and make sure you assign owners to your contacts).
Note: We suggest clicking Save Campaign in-between steps to be sure you never lose any of your work.
Once you're happy with your first step, select Email or Text under Add Another Step.
In the second step, you’ll also choose a duration to wait before sending the next text or email. Note that this time duration is the time in between steps - not from the start of the campaign. You can create these campaigns to make digital content similar to a mailer, and you can make this as simple or complex as you would like.
Setting up your campaign settings for existing or new
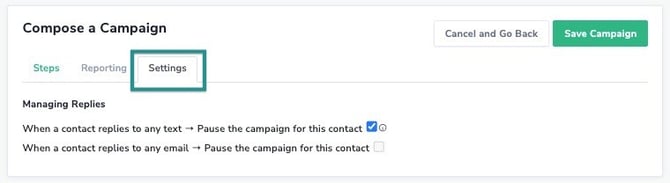
In the settings tab, you have the flexibility to manage how you handle replies. By selecting the option "When a contact replies to any text -> Pause the campaign for this contact," you ensure that if a contact responds to any message (e.g. they reply with "stop"), their campaign subscription will pause. Meanwhile, other contacts in the campaign will continue to receive messages as scheduled. If you prefer that contacts remain subscribed to the campaign even after they reply, simply deselect this option.
-
📩 Note: If the contact replies to a text and the "Pause the campaign for this contact" settings is checked, the system will log a timeline activity in the contact's profile, indicating that the campaign was paused due to the reply. To find these contacts, use Advance filters, look for the field "Engagements" and select Text Unsubscribes. Be sure to check this guide for more info. To resume the campaign, simply navigate to the contact's profile and click the "play" button on that campaign to unpause it.
Pause Campaigns Automatically on Email Replies
We've enabled the campaign setting to pause campaigns on email replies.
Campaigns will automatically pause for a contact as soon as they reply, ensuring your automated system never interrupts a budding conversation.
How it Works:
It’s like passing the baton. When a contact writes back, the automated part of the race is over. The system pauses the campaign and lets you, the closer, take it to the finish line.
The Ground Rules:
-
Individual Focus: Only the contact who replies is paused. It's a private conversation, after all.
-
Full Transparency: The handoff is noted in the contact's timeline for a clear record of engagement.
Important Prerequisite:
Giving Your Campaigns Eyes and Ears to know when to pause, Brokerkit must first see the reply. This is powered by our Email Capture feature. Please ensure auto-forwarding is active for email to your unique Brokerkit email address.
Once you're all finished, click Save Campaign.
Note: Staff or Admins will need to set up their Brokerkit system number before they appear as an option in the From menu. To set up your system number, click your name in the upper right-hand corner and select Phone Number. Enter your local area code, and select an available number that Brokerkit can use to text on your behalf. Then, enter the cell phone you'd like any calls and replies forwarded to.
Once you've built a Smart Campaign, you need to assign it to determine who will receive the email, SMS, or task, depending on the step. You can add new contacts to the campaign individually or in bulk, which will automatically send the selected communication to the recipients.
How to duplicate a campaign?
To clone a campaign, follow these steps:
- Click on Campaigns under Automations in the menu on the left side of the screen.
- On that screen, click Compose Campaign.
- Instead of selecting "Create from scratch," choose one of the campaigns listed below to duplicate and edit.
- Use the available options to customize your duplicated campaign as needed.
How to subscribe or add contacts to a campaign?
You can subscribe new contacts to a campaign individually or in bulk:
- To subscribe contacts to a campaign individually, from the Recruiting or Retention screen, select an agent to open their profile. In the agent profile, go to the Campaign section, select the Smart Campaign you'd like to assign to a lead. Next, Select a Start Date for your campaign and click Schedule to save. Note: The specific time of day (such as 12pm ET) must be configured in the campaign settings before adding contacts. When subscribing contacts, you can only choose the start date - the campaign's pre-configured timing settings determine when messages are sent.
If you started a campaign and then later edit an email or phone number in a step. It will continue to run as scheduled.
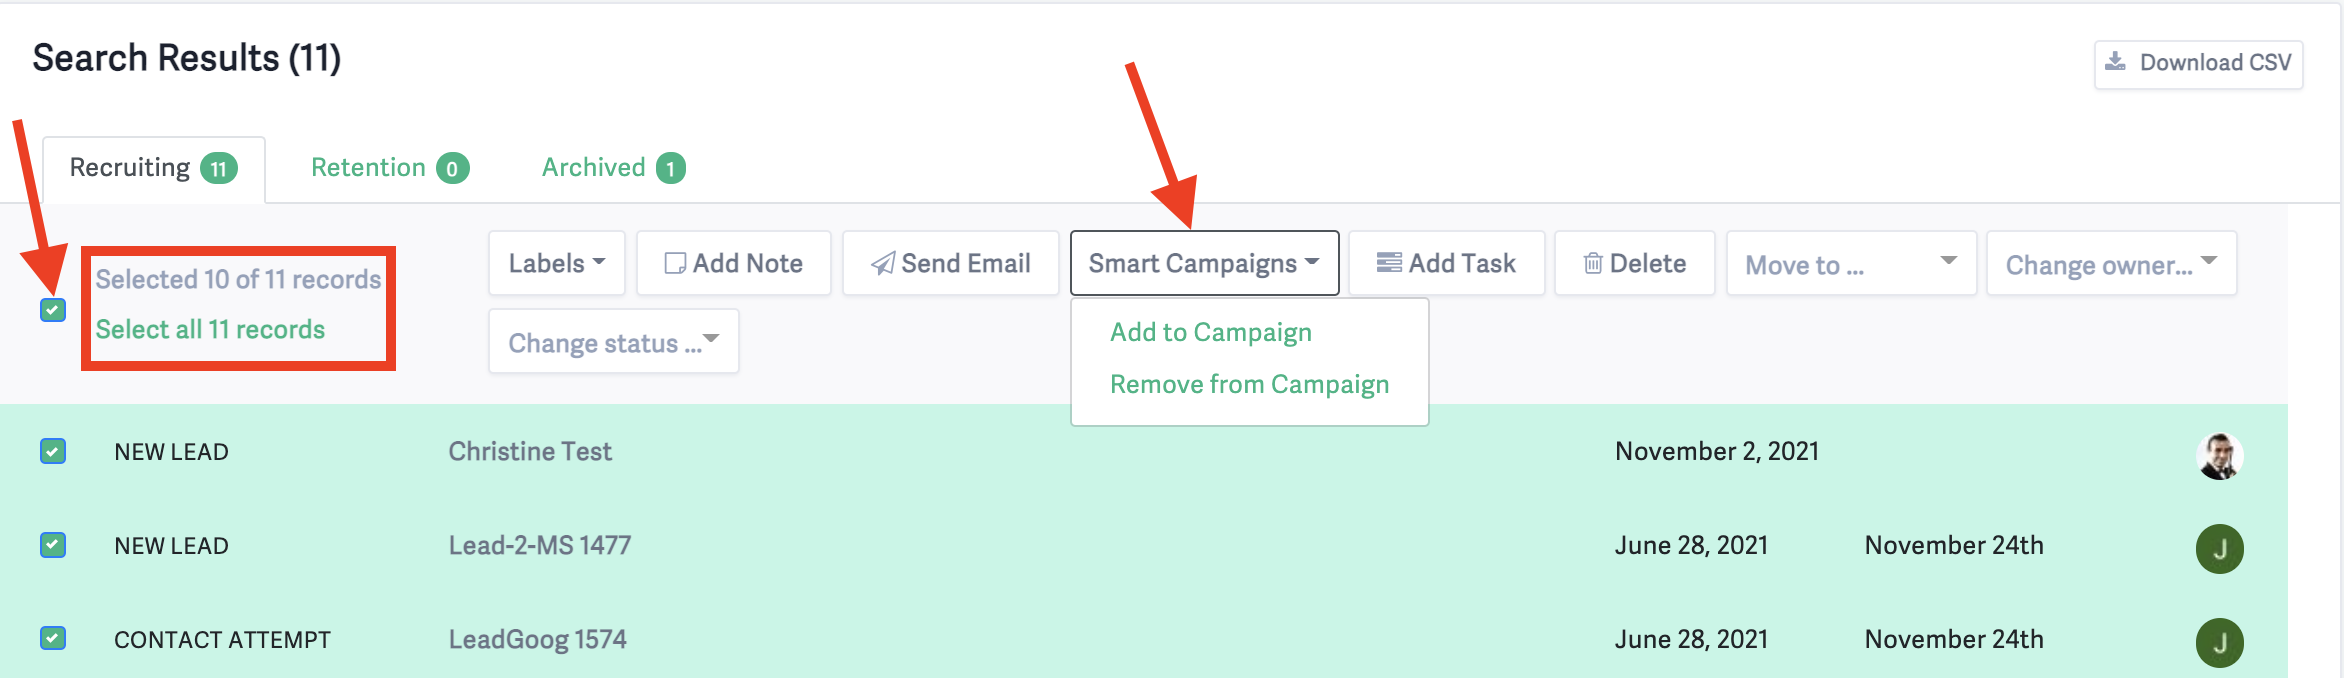
- To subscribe contacts to a campaign in bulk, From the Recruiting or Retention screen, use the Advanced Search Options to narrow your target audience as detailed here. Next, individually check or Select All the agents you'd like to reach, and Brokerkit will display a list of your bulk action options. From here, you can choose to Select All Records on the Page OR All Records in the List. Then, click Smart Campaigns and select Add to Campaign.
Select the campaign you want to apply and, just like with an individual lead, Select a Start Date.

And that's it - you just expanded your reach to thousands, automated your follow-up, and freed up precious time for high-impact recruiting activities. Smart Campaigns can be as simple or as complex as you want to make them, but no matter how you use them, they should become an invaluable tool in your arsenal.
Keep in mind that spamming your audience is never effective, and specific, targeted touches are always more effective than a scattershot approach.
Note: If an agent is already in an active campaign, you can't add them to the same one again to avoid sending the same message twice. Use labels to track campaign assignments—agents can have multiple labels.
Editing Campaigns After They've Started
You can edit your Smart Campaign at any time, even after it has started and contacts are already subscribed.
Changing Email Delays and Timing
If you change the number of days to delay before sending the next email step:
✅ Changes will apply to already-subscribed contacts
- Contacts currently in your campaign will receive upcoming emails with the updated timing
- The new delay takes effect for all future campaign steps
✅ Changes are prospective, not retroactive
- Emails already sent are not affected
- Only upcoming emails will use the new timing
Example:
- Your campaign has 3 steps with 7 days between each step
- Contact A is subscribed and has received Step 1
- You edit the campaign to change delays to 3 days
- Contact A will receive Step 2 in 3 days (not the original 7 days)
- Contact A will receive Step 3 three days after Step 2
All contacts currently subscribed to the campaign will automatically follow the new timing for upcoming steps.
Notification Center
- The Notification Center is a great way to track engagement for your contacts. Please take a look at this helpful article for more details.
- Be sure to track message responses also in your Brokerkit Inbox.
- If you've deactivated text notifications, you can still see who replied to your text campaigns by checking the Notification Center (bell icon) and your Brokerkit Inbox.